
 Per Mårtensson
85a95a78b6
Fixed the readme
Per Mårtensson
85a95a78b6
Fixed the readme
|
5 ore în urmă | |
|---|---|---|
| 3d-models | 1 lună în urmă | |
| SweFlopsMini8.pretty | 1 lună în urmă | |
| bom | 2 luni în urmă | |
| doc | 2 luni în urmă | |
| jlcpcb | 1 lună în urmă | |
| sw | 5 ore în urmă | |
| LICENSE.pdf | 2 luni în urmă | |
| LICENSE_HOWTO.pdf | 2 luni în urmă | |
| README.md | 5 ore în urmă | |
| SweFlopsMini8.kicad_pcb | 1 lună în urmă | |
| SweFlopsMini8.kicad_prl | 1 lună în urmă | |
| SweFlopsMini8.kicad_pro | 1 lună în urmă | |
| SweFlopsMini8.kicad_sch | 1 lună în urmă | |
| SweFlopsMini8.kicad_sym | 1 lună în urmă | |
| fp-info-cache | 2 luni în urmă | |
| fp-lib-table | 2 luni în urmă | |
| sym-lib-table | 1 lună în urmă |
README.md
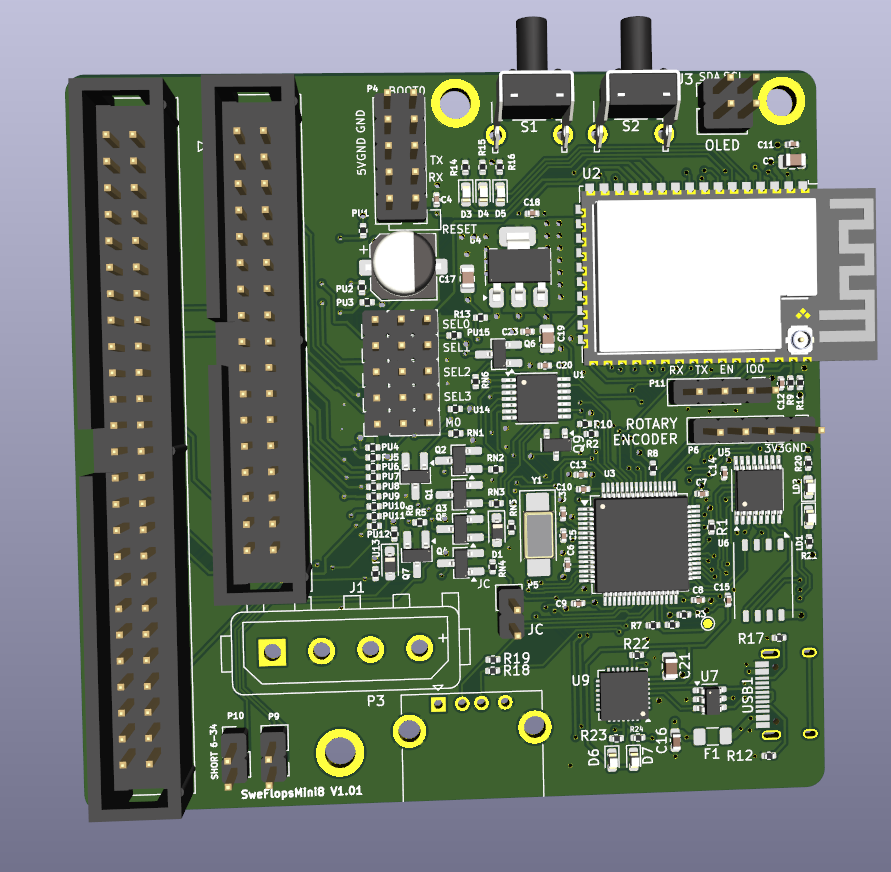
SweFlopsMini8
SweFlopsMini8 is an Open Hardware Floppy Disk Drive emulator/simulator. It was based on OpenFlops but nothing there remains
Summary
From Wikipedia:
Older models of computers, electronic keyboards and industrial automation often used floppy disk drives for data transfer. Older equipment may be difficult to replace or upgrade because of cost, requirement for continuous availability or unavailable upgrades. Proper operation may require operating system, software and data to be read and written from and to floppies, forcing users to maintain floppy drives on supporting systems.
Floppy disks and floppy drives are gradually going out of production, and replacement of malfunctioning drives, and the systems hosting them, is becoming increasingly difficult. Floppy disks themselves are fragile, or may need to be replaced often. An alternative is to use a floppy disk hardware emulator, a device which appears to be a standard floppy drive to the old equipment by interfacing directly to the floppy disk controller, while storing data in another medium such as a USB thumb drive, Secure Digital card, or a shared drive on a computer network. Emulators can also be used as a higher-performance replacement for mechanical floppy disk drives.
SweFlops is an Open Hardware implementation of such an emulator, inspired from the ubiquitous Gotek hardware. It is designed to run the FlashFloppy firmware, which gives it several improvements over the original Gotek:
A modern Gotek replacement with WiFi, embedded storage, and dual-drive emulation support.
First Boot WiFi Setup: After the first boot, the device will start as a WiFi access point. You can connect to this access point to configure your own SSID and password (PSK) for your network.
Follow the on-screen instructions in the configuration portal to complete the setup.
Connecting via FTP
The board also runs an FTP server for file management.
- FTP Port: 21 (default)
- Username: gotek
- Password: gotek
How to connect:
- Ensure the board is powered and connected to your network.
- Use any FTP client (e.g., FileZilla, WinSCP) to connect to the board's IP address on port 21.
- Log in with the provided credentials.
- You can upload, download, and manage disk images stored on the internal NAND flash or USB connector.
Connecting via WebDAV
The board runs a WebDAV server on port 8080 (default). You can connect to it using any WebDAV client.
- URL format:
http://<device-ip>:8080/
Replace <device-ip> with the actual IP address assigned to your board. Be sure to include :8080 in the URL to specify the port.
Replace <device-ip> with the actual IP address assigned to your board.
How to connect:
- Ensure the board is powered and connected to your network.
- Use a WebDAV client (e.g., Windows Explorer, Cyberduck, or
curl) to connect tohttp://<device-ip>:8080/. - You can browse, upload, and manage disk images stored on the internal NAND flash or USB connector.
Web GUI and OSD Information
The device provides a web-based GUI on port 80. This interface displays information that would normally appear on the OSD, directly on the webpage.
- URL:
http://<device-ip>/
Replace <device-ip> with the actual IP address assigned to your board.
How to connect:
- Ensure the board is powered and connected to your network.
- Open a web browser and navigate to
http://<device-ip>/to access the web GUI and view OSD information.
Note: To upload or download files from the internal flash, you must disable the STM32 using a switch in the web UI. This ensures safe access to the storage.
A simple gotek replacement with WiFi and embedded storage.
Disk images can be stored and used from either the internal NAND flash or via the USB connector.
Note: The board is prepared for emulation of two drives, a feature not yet implemented in FlashFloppy.
OTA Firmware Update
The board supports OTA (Over-The-Air) firmware updates via a web interface.
- URL format:
http://<device-ip>/webota
Replace <device-ip> with the actual IP address assigned to your board.
How to update:
- Ensure the board is powered and connected to your network.
- Open a web browser and navigate to
http://<device-ip>/webota. - Follow the on-screen instructions to upload and flash new firmware.
Getting Started: Flashing and Powering the Board
1. Flashing the ESP32
Before you can flash the STM32, you must first flash the ESP32. This is required for proper board initialization and communication.
Steps:
- Connect the board to your computer using the USB-C port.
- The ESP32 must be flashed via the serial port P11.
- Use your preferred flashing tool (e.g., PlatformIO, esptool) to upload the firmware to the ESP32.
- Ensure the ESP32 boots and runs correctly before proceeding.
2. Flashing the STM32
Once the ESP32 is up and running, you can flash the STM32 using your chosen method (e.g., ST-Link, etc.).
Note: The STM32 may rely on the ESP32 for certain board functions, so flashing order is important.
Flashing FlashFloppy to STM32
To flash FlashFloppy firmware to the STM32, follow the official instructions and documentation: https://github.com/keirf/FlashFloppy/wiki/Firmware-Programming
The serial adapter is only necessary for the first flashing. Subsequent updates [can be done easily via USB]
Note that most components are necessary, but there are a few you can skip if you are feeling lazy:
Configuration
Please refer to the FlashFloppy wiki for the initial setup and an overview of the available configuration options.
Some options that you will want to override the default values of, in order to take advantage of all the features OpenFlops provides, are the following:
motor-delayrotarydisplay-type
3. USB-C Port Usage
- **Debugging:** Connect to your computer for serial output and firmware flashing.
- **Power Source:** The board is powered via the USB-C connection or the power headers.
Tip: Always ensure a stable USB-C connection for reliable flashing and debugging.
- **To get it running please flash the ESP32S3 first!!!
- **The STM32 will be hold in reset mode until the ESP32S3 is operational
License
The SweFlopsMini8 documentation, including the design itself, is copyright © Per Mårtensson 2025.
SweFlopsMini8 is Open Hardware licensed under the CERN OHL v. 1.2.
You may redistribute and modify this documentation under the terms of the CERN OHL v.1.2. This documentation is distributed as is and WITHOUT ANY EXPRESS OR IMPLIED WARRANTIES whatsoever with respect to its functionality, operability or use, including, without limitation, any implied warranties OF MERCHANTABILITY, SATISFACTORY QUALITY, FITNESS FOR A PARTICULAR PURPOSE or infringement. We expressly disclaim any liability whatsoever for any direct, indirect, consequential, incidental or special damages, including, without limitation, lost revenues, lost profits, losses resulting from business interruption or loss of data, regardless of the form of action or legal theory under which the liability may be asserted, even if advised of the possibility or likelihood of such damages.
A copy of the full license is included in file LICENSE.pdf, please refer to it for applicable conditions. In order to properly deal with its terms, please see file LICENSE_HOWTO.pdf.
The contact points for information about manufactured Products (see section 4.2) are listed in file PRODUCT.md.
Any modifications made by Licensees (see section 3.4.b) shall be recorded in file CHANGES.md.
The Documentation Location of the original project is https://github.com/SukkoPera/OpenFlops/.
Support the Project
Not sure howto but if you really want you will find away to contact me
Thanks
- H.M for publishing the original Gotek schematics
- keirf for FlashFloppy