
 Ayush Sharma
a4db2db5f1
Update README.md
Ayush Sharma
a4db2db5f1
Update README.md
|
4 tahun lalu | |
|---|---|---|
| .github | 5 tahun lalu | |
| docs | 5 tahun lalu | |
| examples | 5 tahun lalu | |
| src | 5 tahun lalu | |
| ui | 5 tahun lalu | |
| .gitattributes | 6 tahun lalu | |
| .gitignore | 6 tahun lalu | |
| .travis.yml | 4 tahun lalu | |
| LICENSE | 6 tahun lalu | |
| README.md | 4 tahun lalu | |
| build_platformio.sh | 5 tahun lalu | |
| keywords.txt | 6 tahun lalu | |
| library.json | 5 tahun lalu | |
| library.properties | 5 tahun lalu |
README.md
![]()
![]()
![]()
Perform OTAs for ESP8266 & ESP32 Asynchronously
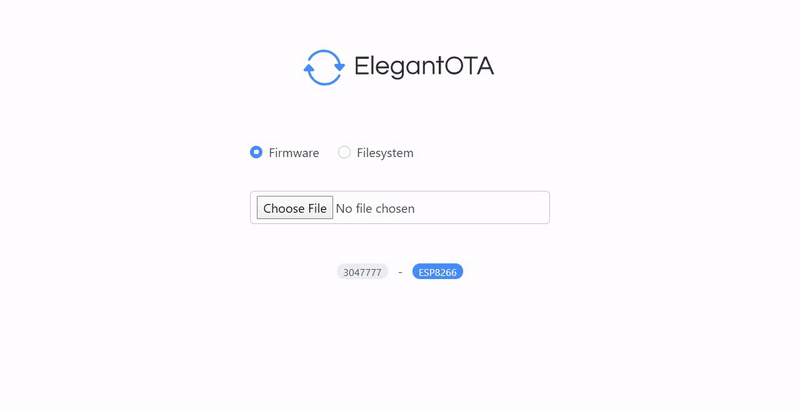
AsyncElegantOTA provides a beautiful interface to upload Over the Air `.bin` updates to your ESP Modules with precise status and progress displayed over UI. This Library shows the current upload progress of your OTA and once finished, it will display the status of your OTA. This Version of Library uses AsyncWebServer. Thanks to @me-no-dev for a wonderful webserver library.
Preview
How to Install
Directly Through Arduino IDE ( Currently Submitted for Approval. Use Mannual Install till it gets Approved.)
Go to Sketch > Include Library > Library Manager > Search for "AsyncElegantOTA" > Install
Manual Install
For Windows: Download the Repository and extract the .zip in Documents>Arduino>Libraries>{Place "ElegantOTA" folder Here}
For Linux: Download the Repository and extract the .zip in Sketchbook>Libraries>{Place "ElegantOTA" folder Here}
Manually through IDE
Download the Repository, Go to Sketch>Include Library>Add .zip Library> Select the Downloaded .zip File.
Documentation
AsyncElegantOTA is a dead simple library which does your work in just 1 Line. Honestly, It's just a wrapper library which injects it's own elegant webpage instead of the ugly upload page which comes by default in Arduino Library.
Include AsyncElegantOTA Library `#include ` at top of your Arduino Code. Paste this - `AsyncElegantOTA.begin(&server);` line above your `server.begin();` That's all! Now copy the IPAddress displayed over your Serial Monitor and go to `http:///update` in browser. ( where `` is the IP of your ESP Module)#### Additional Security: If you would like to add login to your OTA webpage, then please replace `AsyncElegantOTA.begin(&server);` with `AsyncElegantOTA.begin(&server, "username", "password");`. This will prevent unauthorized requests to your OTA webpage and prevent unauthorized firmware upload to your MCU.
Tutorials
Tutorials for AsyncElegantOTA is live on RandomNerdTutorials.
ESP8266
Arduino IDE:
https://randomnerdtutorials.com/esp8266-nodemcu-ota-over-the-air-arduino/
PlatformIO:
https://randomnerdtutorials.com/esp8266-nodemcu-ota-over-the-air-vs-code/
ESP32
Arduino IDE:
https://randomnerdtutorials.com/esp32-ota-over-the-air-arduino/
PlatformIO:
https://randomnerdtutorials.com/esp32-ota-over-the-air-vs-code/
Examples
For ESP8266:
#include <ESP8266WiFi.h>
#include <ESPAsyncTCP.h>
#include <ESPAsyncWebServer.h>
#include <AsyncElegantOTA.h>

const char* ssid = "........";
const char* password = "........";

AsyncWebServer server(80);


void setup(void) {
  Serial.begin(115200);
  WiFi.mode(WIFI_STA);
  WiFi.begin(ssid, password);
  Serial.println("");

  // Wait for connection
  while (WiFi.status() != WL_CONNECTED) {
    delay(500);
    Serial.print(".");
  }
  Serial.println("");
  Serial.print("Connected to ");
  Serial.println(ssid);
  Serial.print("IP address: ");
  Serial.println(WiFi.localIP());

  server.on("/", HTTP_GET, [](AsyncWebServerRequest *request) {
    request->send(200, "text/plain", "Hi! I am ESP8266.");
  });

  AsyncElegantOTA.begin(&server);    // Start ElegantOTA
  server.begin();
  Serial.println("HTTP server started");
}

void loop(void) {
  AsyncElegantOTA.loop();
}
For ESP32:
#include <WiFi.h>
#include <AsyncTCP.h>
#include <ESPAsyncWebServer.h>
#include <AsyncElegantOTA.h>

const char* ssid = "........";
const char* password = "........";

AsyncWebServer server(80);


void setup(void) {
  Serial.begin(115200);
  WiFi.mode(WIFI_STA);
  WiFi.begin(ssid, password);
  Serial.println("");

  // Wait for connection
  while (WiFi.status() != WL_CONNECTED) {
    delay(500);
    Serial.print(".");
  }
  Serial.println("");
  Serial.print("Connected to ");
  Serial.println(ssid);
  Serial.print("IP address: ");
  Serial.println(WiFi.localIP());

  server.on("/", HTTP_GET, [](AsyncWebServerRequest *request) {
    request->send(200, "text/plain", "Hi! I am ESP32.");
  });

  AsyncElegantOTA.begin(&server);    // Start ElegantOTA
  server.begin();
  Serial.println("HTTP server started");
}

void loop(void) {
  AsyncElegantOTA.loop();
}
Contributions
Every Contribution to this repository is highly appriciated! Don't fear to create pull requests which enhance or fix the library as ultimatly you are going to help everybody.
If you want to donate to the author then you can buy me a coffee, It really helps me keep these libraries updated: